
이미지
-
다빈치 리졸브 15 - 이미지 따라다니게 하기(Fusion Tracker 사용)2019.09.14
-
안드로이드 카메라 호출해서 이미지 크롭하기2013.07.20
다빈치 리졸브 15 - 이미지 따라다니게 하기(Fusion Tracker 사용)
다빈치 리졸브 15 에서 이미지가 특정 위치를 따라다니게 하는 방법
자세한 방법은 동영상을 참고
먼저 Fusion 탭에 진입하여 MediaIn 1 선택된 채로 컨트롤 + 스페이스바를 누르면 검색창이 뜬다. tracker를 검색하여 추가해준다.

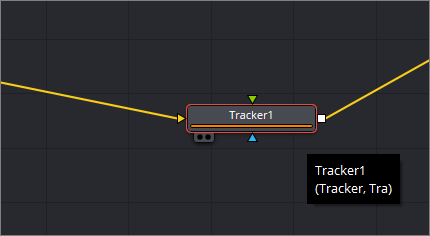
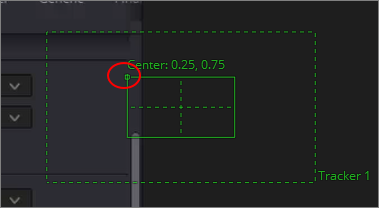
트래커를 선택하면 영상 위에 트래커가 노출이 된다. 왼쪽 모서리를 선택하여 드래그하여 위치 추적할 곳에 둔다
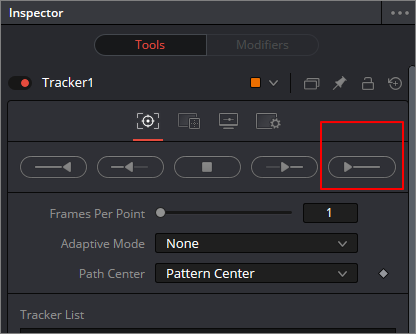
그리고 왼쪽 Inspector에서 5번째 재생바 버튼을 눌러 추적을 시작함
그럼 트래킹이 시작되고 완료되면 이미지를 아래 노드 쪽으로 끌어온 뒤 컨트롤 + 스페이스바 를 눌러 transform 을 추가해준다
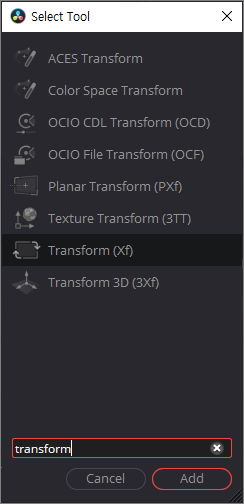
transform을 추가한 뒤 트래커와 연결해주어야 한다.
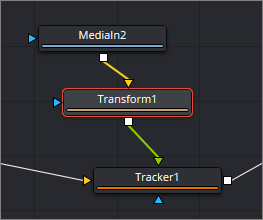
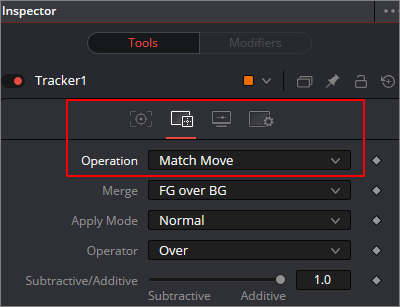
그리고 트래커 노드 선택 후 Operation 메뉴에서 Match Move로 변경해주면 영상 위에 이미지가 노출된다.
이미지가 노출되면 다시 transform 노드를 선택해준다. 그럼 이미지에 아래와 같이 표시가 된다.
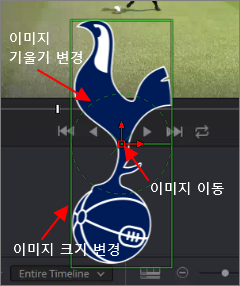
사각형은 이미지 크기를, 원형은 이미지 기울기를, 가운데는 이미지를 이동 시킬 수 있다. 이미지를 배치해놓고 재생하면 트래킹한 경로대로 이미지가 잘 따라다니게 된다.
'지식메모 > Davinci Resolve' 카테고리의 다른 글
| 투명한 손글씨 애니메이션을 만들어 유용하게 써먹기 [다빈치 리졸브 16.1.1] (0) | 2019.12.05 |
|---|---|
| 다빈치 리졸브에서 영상 일부분만 따로 렌더링하기 (1) | 2019.11.13 |
| 다빈치 리졸브 영상편집 소소한 팁 (영상 옮기기,끼워넣기,복제하기) (0) | 2019.09.01 |
| 다빈치 리졸브에서 영상 잘라내기 How to Crop the video in Davinci Resolve (0) | 2019.08.08 |
| 다빈치 리졸브 15 초간단 손떨림 보정하기 (0) | 2019.07.14 |
안드로이드 Spinner(스피너) 값 전달하기
스피너를 이용하여 값을 전달한 후 값에 따른 이미지를 출력하였다.
string.xml에 스피너에 쓰일 목록을 만들어둔다.
<string name="season">시즌</string>

    <string name="season_prompt">시즌 선택</string>
    <string-array name="season_array">
        <item>봄</item>
        <item>여름</item>
        <item>가을</item>
        <item>겨울</item>
    </string-array>
그 다음 send.xml
 <Spinner
         android:id="@+id/spinner_season" <!--스피너 아이디-->
         android:layout_width="wrap_content"
         android:layout_height="wrap_content"
         android:prompt="@string/season_prompt"<!-- string.xml에서 작성한 목록 -->
         android:layout_marginRight="10dp"
          />
이렇게 스피너를 만들어준다.
그리고 SendActivity.java 에서 스피너 값을 보내주자 OnCreate 부분에
Spinner spinner = (Spinner)findViewById(R.id.spinner_season);//send.xml의 스피너 아이디

		ArrayAdapter<CharSequence> adapter = ArrayAdapter.createFromResource(this, R.array.season_array,
				android.R.layout.simple_spinner_item);

		adapter.setDropDownViewResource(android.R.layout.simple_spinner_dropdown_item);
		spinner.setAdapter(adapter);
이렇게 스피너를 선언해주고 Onclick메소드에 스피너 값을 인텐트에 태워 보낸다.
String str_season = spinner.getSelectedItem().toString();

 Intent it3 = new Intent(this,ReceiveActivity.class);


 it3.putExtra("it3_season", str_season);	//it3_season 이라는 스트링으로 str_season 값을 넘긴다.

startActivity(it3);
이제 스피너 값에 따른 이미지를 출력하기 위해 receive.xml 에
이미지 뷰를 만들었다
  <ImageView
       android:id="@+id/season_year"

       android:layout_width="wrap_content"
       android:layout_height="wrap_content"

       />
이제 ReceiveActivity.java 에서 받아보자.
마찬가지로 OnCreate 부분에
Intent it3=getIntent();		//인텐트를 받아오고

		String str_season= it3.getStringExtra("it3_season"); //it3_season으로 보내온 값을 str_season에 저장

		ImageView season = (ImageView)findViewById(R.id.season_year); //사진을 출력할 이미지뷰
		if(str_season.equals("봄")){ //str_season 값이 봄이라면
			BitmapDrawable img_season = (BitmapDrawable)getResources().getDrawable(R.drawable.spring); //봄 사진 가져와서
			season.setImageDrawable(img_season);//봄 사진 출력
		}else if(str_season.equals("여름")){
			BitmapDrawable img_season = (BitmapDrawable)getResources().getDrawable(R.drawable.summer);
			season.setImageDrawable(img_season);
		}else if(str_season.equals("겨울")){
			BitmapDrawable img_season = (BitmapDrawable)getResources().getDrawable(R.drawable.autumn);
			season.setImageDrawable(img_season);
		}else if(str_season.equals("가을")){
			BitmapDrawable img_season = (BitmapDrawable)getResources().getDrawable(R.drawable.winter);
			season.setImageDrawable(img_season);
		}
여기서 애를 먹었던게 if 값을 그냥 평소 하던대로
if(str_season == "봄") 이런식으로 해줬는데 안되서 찾아보니까 String 값은
str_season.equals("봄")
이런식으로 해줘야 했다.
이제 스피너로 봄 값이 넘어오면 이미지뷰에 봄 사진을 넣어주고 여름이면 여름사진을 보여준다.
아 소스코드 태그 은근 귀찮네..
'지식메모 > 안드로이드 Android' 카테고리의 다른 글
| 안드로이드 레이아웃 버튼 보이기 숨기기 (1) | 2013.09.22 |
|---|---|
| 안드로이드 EditText 에디트텍스트 값 남겨두기 (0) | 2013.09.09 |
| 안드로이드 dip px 변환하기 (0) | 2013.07.23 |
| 안드로이드 버튼 여러개 쓰기 (0) | 2013.07.21 |
| 안드로이드 공유하기 기능쓰기 (7) | 2013.07.21 |
안드로이드 공유하기 기능쓰기
이미지를 캡쳐해서 저장한 후 공유하기를 통해 이미지를 공유하고 싶었다.
이 공유하기 기능을 사용하면 카톡 페북 미투데이 등등 메뉴가 저절로 나온다.신기방기
Intent intentSend = new Intent(Intent.ACTION_SEND); intentSend.setType("image/*"); intentSend.putExtra(Intent.EXTRA_STREAM, Uri.parse(파일경로)); startActivity(Intent.createChooser(intentSend, "공유")); |
특정파일을 공유하기 위해 다음과 같이 사용했다.
공유하기 버튼을 만들어 그 안에 집어넣었다.
Intent it3=getIntent();	//파일명을 가져오기 위한 인텐트(에디트텍스트에서 이름입력받은 걸 파일명으로 쓰기 위해)

	String str_name=it3.getStringExtra("it3_name");	//이름을 가져온다.

	File fileRoute = null;

	fileRoute = Environment.getExternalStorageDirectory(); //sdcard 파일경로 선언


        File files = new File(fileRoute,"/temp/"+str_name+"-.jpeg"); //temp폴더에 이름으로 저장된 jpeg파일 경로 선언


	 if(files.exists()==true)  //파일유무확인

	 {

			 Intent intentSend  = new Intent(Intent.ACTION_SEND);

			 intentSend.setType("image/*");


//이름으로 저장된 파일의 경로를 넣어서 공유하기

			 intentSend.putExtra(Intent.EXTRA_STREAM, Uri.parse(fileRoute+"/temp/"+str_name+"-.jpeg"));


			 startActivity(Intent.createChooser(intentSend, "공유")); //공유하기 창 띄우기

		 }else{

//파일이 없다면 저장을 해달라는 토스트메세지를 띄운다.

			 Toast.makeText(getApplicationContext(), "저장을 먼저 해주세요", Toast.LENGTH_LONG).show();

		 }
소스양식버전
Intent it3=getIntent(); //파일명을 가져오기 위한 인텐트(에디트텍스트에서 이름입력받은 걸 파일명으로 쓰기 위해)
String str_name=it3.getStringExtra("it3_name"); //이름을 가져온다.
File fileRoute = null;
fileRoute = Environment.getExternalStorageDirectory(); //sdcard 파일경로 선언
File files = new File(fileRoute,"/temp/"+str_name+"-.jpeg"); //temp폴더에 이름으로 저장된 jpeg파일 경로 선언
if(files.exists()==true) //파일유무확인
{
Intent intentSend = new Intent(Intent.ACTION_SEND);
intentSend.setType("image/*");
//이름으로 저장된 파일의 경로를 넣어서 공유하기
intentSend.putExtra(Intent.EXTRA_STREAM, Uri.parse(fileRoute+"/temp/"+str_name+"-.jpeg"));
startActivity(Intent.createChooser(intentSend, "공유")); //공유하기 창 띄우기
}else{
//파일이 없다면 저장을 해달라는 토스트메세지를 띄운다.
Toast.makeText(getApplicationContext(), "저장을 먼저 해주세요", Toast.LENGTH_LONG).show();
}
'지식메모 > 안드로이드 Android' 카테고리의 다른 글
| 안드로이드 dip px 변환하기 (0) | 2013.07.23 |
|---|---|
| 안드로이드 버튼 여러개 쓰기 (0) | 2013.07.21 |
| 안드로이드 숫자 키보드 띄우기 (0) | 2013.07.20 |
| 안드로이드 EditText에 텍스트 집어넣기 (0) | 2013.07.20 |
| 안드로이드 카메라 호출해서 이미지 크롭하기 (0) | 2013.07.20 |
안드로이드 카메라 호출해서 이미지 크롭하기
내가 참고한 블로그.
http://theeye.pe.kr/entry/example-of-image-crop-with-camera-and-album-picker-on-android?category=18
트랙백은 뭐하는건지 모르겠다..
누가 알려주실 분..
그리고 위 소스는 정사각형으로 밖에 자르기가 안되는데 직사각형으로도 자르게 하려면
	      case PICK_FROM_CAMERA:
	      {
	        // 이미지를 가져온 이후의 리사이즈할 이미지 크기를 결정합니다.
	        // 이후에 이미지 크롭 어플리케이션을 호출하게 됩니다.

	        Intent intent = new Intent("com.android.camera.action.CROP");
	        intent.setDataAndType(mImageCaptureUri, "image/*");

	        intent.putExtra("outputX", 120);
	        intent.putExtra("outputY", 130);
	        intent.putExtra("aspectX", 1); //이걸 삭제한다
	        intent.putExtra("aspectY", 1); //이걸 삭제한다
	        intent.putExtra("scale", true);
	        intent.putExtra("return-data", true);

	        startActivityForResult(intent, CROP_FROM_CAMERA);


	        break;
	      }
'지식메모 > 안드로이드 Android' 카테고리의 다른 글
| 안드로이드 숫자 키보드 띄우기 (0) | 2013.07.20 |
|---|---|
| 안드로이드 EditText에 텍스트 집어넣기 (0) | 2013.07.20 |
| 안드로이드 이미지 캡쳐시 Out of Memory 현상 해결법 (4) | 2013.07.19 |
| 안드로이드 이미지버튼으로 버튼 눌림 효과 주기 (0) | 2013.07.17 |
| 안드로이드 뒤로가기 버튼으로 종료하기 (0) | 2013.07.17 |