안드로이드
-
AMD (라이젠 5 2600) 안드로이드 스튜디오 에뮬레이터 실행하는 방법2020.04.08
-
안드로이드 터치 한번으로 글자 복사하기2017.07.26
-
Android 손쉽게 권한 획득 가능한 라이브러리 TedPermission2017.07.11
-
안드로이드 버튼 배경 투명하게 하는법2017.04.04
AMD (라이젠 5 2600) 안드로이드 스튜디오 에뮬레이터 실행하는 방법
먼저 CPU 가상화 지원 확인
https://gbworld.tistory.com/1604
CPU 가상화 AMD SVM, VT 활성화 하는 방법
이번 포스팅에는 녹스, 미뮤, 모모 등의 앱 플레이어의 퍼포먼스를 높이기 위해 필수적인 CPU 가상화 모드 설정 방법에 대해 정리해봤습니다. 참고로 SVM은 AMD CPU의 가상화 옵션, VT는 인텔 CPU의 가상화 옵션을..
gbworld.tistory.com
윈도우 설정
[Android]안드로이드 스튜디오 AVD(에뮬레이터) AMD CPU에서도 빠르게 사용하기
안드로이드 스튜디오를 이용하면서 AVD(에뮬레이터)를 자주 사용합니다. 하지만 AMD CPU에서는 작...
blog.naver.com
'지식메모 > 안드로이드 Android' 카테고리의 다른 글
Android 로그인 아이디 암호 저장하기 [SharedPreferences 사용]
SharedPreferences 사용법은 이분의 블로그를 보고 참고하였음
https://re-build.tistory.com/37
[Android] SharedPreferences 사용하기
이래저래 바쁘다는 핑계로 미루다가 오랜만에 포스팅을 하게 되었습니다. 벌써 새해가 밝았네요. 저만 시간이 빨리 가는 것처럼 느껴지는 건 아니겠죠? 모두 새해에는 좋은 일이 생겼으면 좋겠습니다. SharedPrefe..
re-build.tistory.com
앱을 쓰면 자주 보이는 로그인 정보 저장 기능을 구현한다.
UI 는 다음과 같다
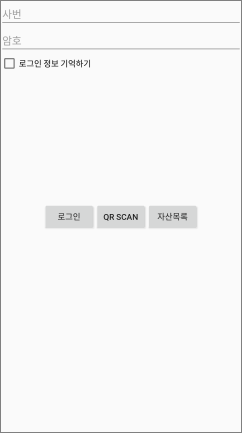
구현 목표는
- 아이디와 암호를 체크박스 옵션으로 저장 유무를 결정한다.
- 아이디와 암호를 따로 구분하지 않고 같이 저장함
- 로그인시 아이디와 암호 둘 중 하나가 입력되지 않으면 "아이디/암호를 입력해주세요" 토스트메시지를 띄운다
- 아이디/암호 입력 후 로그인 정보 기억하기 체크만 해도 정보가 저장된다.
- 로그인 정보 기억하기를 체크하면 저장되고 해제하면 정보를 삭제한다
이런 동작을 하도록 구현
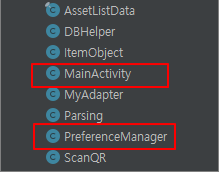
위 블로그를 참고하여 PreferenceManager를 만들어주고 MainActivity 이렇게 2개의 파일만 준비되어있으면 된다.
activity_main.xml
<RelativeLayout xmlns:android="http://schemas.android.com/apk/res/android"
    xmlns:tools="http://schemas.android.com/tools"
    android:layout_width="match_parent"
    android:layout_height="match_parent"
    tools:context=".MainActivity">

    <LinearLayout
        android:layout_width="wrap_content"
        android:layout_height="wrap_content"
        android:layout_centerVertical="true"
        android:layout_centerHorizontal="true"
        android:orientation="horizontal">
        <Button
            android:layout_width="wrap_content"
            android:layout_height="wrap_content"
            android:text="로그인"
            android:id="@+id/parse"/>

        <Button
            android:layout_width="wrap_content"
            android:layout_height="wrap_content"
            android:text="QR Scan"
            android:id="@+id/scanQR"/>

        <Button
            android:layout_width="wrap_content"
            android:layout_height="wrap_content"
            android:text="자산목록"
            android:id="@+id/dbList"/>
    </LinearLayout>

    <LinearLayout
        android:layout_width="match_parent"
        android:layout_height="match_parent"
        android:orientation="vertical">

        <EditText
            android:id="@+id/et_id"
            android:layout_width="match_parent"
            android:layout_height="wrap_content"
            android:ems="10"
            android:inputType="textPersonName"
            android:hint="사번" />

        <EditText
            android:id="@+id/et_pw"
            android:layout_width="match_parent"
            android:layout_height="wrap_content"
            android:ems="10"
            android:inputType="textPassword"
            android:hint="암호"/>

        <CheckBox
            android:id="@+id/cb_save"
            android:layout_width="match_parent"
            android:layout_height="wrap_content"
            android:text="로그인 정보 기억하기" />

    </LinearLayout>

</RelativeLayout>
자세한 설명은 주석 참고
MainActivity.java
import android.content.Context;
import android.content.Intent;
import android.content.SharedPreferences;
import android.os.Bundle;
import android.text.TextUtils;
import android.view.View;
import android.widget.Button;
import android.widget.CheckBox;
import android.widget.EditText;
import android.widget.TextView;
import android.widget.Toast;

import androidx.appcompat.app.AppCompatActivity;

public class MainActivity extends AppCompatActivity {
    private Button parsingBtn;
    private Button scanQRBtn;
    private Button ListBtn;
    private EditText et_id;
    private EditText et_pw;
    private CheckBox cb_save;
    String id,pw;
    private Context mContext;

    @Override
    protected void onCreate(Bundle savedInstanceState) {
        super.onCreate(savedInstanceState);
        setContentView(R.layout.activity_main);
        mContext = this; // 이거 필수!

        parsingBtn = (Button) findViewById(R.id.parse);
        scanQRBtn = (Button) findViewById(R.id.scanQR);
        ListBtn = (Button) findViewById(R.id.dbList);
        et_id = (EditText) findViewById(R.id.et_id);
        et_pw = (EditText) findViewById(R.id.et_pw);
        cb_save = (CheckBox) findViewById(R.id.cb_save);


        boolean boo = PreferenceManager.getBoolean(mContext,"check"); //로그인 정보 기억하기 체크 유무 확인
        if(boo){ // 체크가 되어있다면 아래 코드를 수행
            //저장된 아이디와 암호를 가져와 셋팅한다.
            et_id.setText(PreferenceManager.getString(mContext, "id"));
            et_pw.setText(PreferenceManager.getString(mContext, "pw"));
            cb_save.setChecked(true); //체크박스는 여전히 체크 표시 하도록 셋팅
        }

        parsingBtn.setOnClickListener(new View.OnClickListener(){
            public void onClick(View v){ //로그인 버튼 눌렀을 때 동작
                //아이디 암호 입력창에서 텍스트를 가져와 PreferenceManager에 저장함
                PreferenceManager.setString(mContext, "id", et_id.getText().toString()); //id라는 키값으로 저장
                PreferenceManager.setString(mContext, "pw", et_pw.getText().toString()); //pw라는 키값으로 저장

                Intent intent = new Intent(MainActivity.this, Parsing.class); //이건 없어도 무방
                // 저장한 키 값으로 저장된 아이디와 암호를 불러와 String 값에 저장
                String checkId = PreferenceManager.getString(mContext, "id");
                String checkPw = PreferenceManager.getString(mContext, "pw");
                //아이디와 암호가 비어있는 경우를 체크
                if (TextUtils.isEmpty(checkId) || TextUtils.isEmpty(checkPw)){
                    //아이디나 암호 둘 중 하나가 비어있으면 토스트메시지를 띄운다
                    Toast.makeText(MainActivity.this, "아이디/암호를 입력해주세요",
                            Toast.LENGTH_SHORT).show();
                }else { //둘 다 충족하면 다음 동작을 구현해놓음
                    intent.putExtra("id",checkId);
                    intent.putExtra("pw",checkPw);
                    startActivity(intent);
                }
            }
        });

        //로그인 기억하기 체크박스 유무에 따른 동작 구현
        cb_save.setOnClickListener(new CheckBox.OnClickListener() {
            @Override
            public void onClick(View v) {
                if (((CheckBox)v).isChecked()) { // 체크박스 체크 되어 있으면
                    //editText에서 아이디와 암호 가져와 PreferenceManager에 저장한다.
                    PreferenceManager.setString(mContext, "id", et_id.getText().toString()); //id 키값으로 저장
                    PreferenceManager.setString(mContext, "pw", et_pw.getText().toString()); //pw 키값으로 저장
                    PreferenceManager.setBoolean(mContext, "check", cb_save.isChecked()); //현재 체크박스 상태 값 저장
                } else { //체크박스가 해제되어있으면
                    PreferenceManager.setBoolean(mContext, "check", cb_save.isChecked()); //현재 체크박스 상태 값 저장
                    PreferenceManager.clear(mContext); //로그인 정보를 모두 날림
                }
            }
        }) ;


        scanQRBtn.setOnClickListener(new View.OnClickListener(){
            public void onClick(View v){
                Intent intent = new Intent(MainActivity.this, ScanQR.class);
                startActivity(intent);
            }
        });

        ListBtn.setOnClickListener(new View.OnClickListener(){
            public void onClick(View v){
//                Intent intent = new Intent(MainActivity.this, DBHelper.class);
//                startActivity(intent);
            }
        });
    }
}
동작 별 코드를 설명하자면
1. 아이디와 암호를 입력 후 로그인 기억하기를 체크했을 때

이 코드가 동작하게 되어 PreferenceManager에 아이디와 암호가 각각 "id","pw"라는 키값으로 저장된다. 사용할 때는 getString에서 이 키값으로 불러와 사용하면 된다.
2. 로그인 기억하기가 체크된 상태로 앱을 종료하고 다시 실행했을 때
        boolean boo = PreferenceManager.getBoolean(mContext,"check"); //로그인 정보 기억하기 체크 유무 확인
        if(boo){ // 체크가 되어있다면 아래 코드를 수행
            //저장된 아이디와 암호를 가져와 셋팅한다.
            et_id.setText(PreferenceManager.getString(mContext, "id"));
            et_pw.setText(PreferenceManager.getString(mContext, "pw"));
            cb_save.setChecked(true); //체크박스는 여전히 체크 표시 하도록 셋팅
        }
위 코드에서 로그인 정보 기억하기 체크 유무를 확인한다. 체크가 된 상태로 종료했기 때문에 boo는 true 가 나올 테고 저장되어 있던 "id","pw"키 값을 불러와 아이디,암호 입력창에 셋팅해놓는다.
3. 로그인 기억하기 체크를 해제했을 때
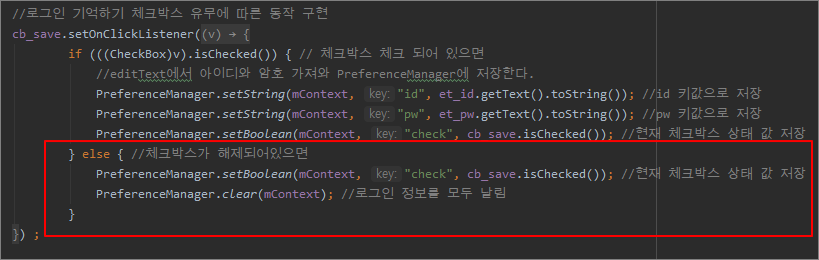
위 코드가 동작하여 현재 체크 해제 상태이므로 false를 PreferencerManager에 상태 값을 저장하고 저장된 로그인 정보를 clear 코드로 모두 날린다. 그럼 앱을 종료하고 다시 실행했을 때 입력창에 아무것도 입력되어있지 않는 상태로 나타난다.
구현 방법은 사용자마다 다르고 더 깔끔하고 단순하게 작성할 수도 있지만 동작만 된다면 끝. 더 건드렸다가 다시 미궁 속으로 빠지긴 싫다.
'지식메모 > 안드로이드 Android' 카테고리의 다른 글
apk 빌드시 app:transformClassesWithDexForDebug com.android.dex.DexException: Multiple dex files define 에러 해결
뜬금 apk 빌드하는데 이런 에러가 떴다.
Error:Execution failed for task ':app:transformClassesWithDexForDebug'.
> com.android.build.api.transform.TransformException: com.android.ide.common.process.ProcessException: java.util.concurrent.ExecutionException: com.android.dex.DexException: Multiple dex files define Landroid/support/v4/accessibilityservice/AccessibilityServiceInfoCompat$AccessibilityServiceInfoVersionImpl;
검색해보니 메소드 6만5천줄 초과인가 뭔가해서 멀티덱스 를 추가해줘야되고 이런 답변들이 있었는데 해봐도 되지 않았다
그러다가 라이브러리?가 중복실행되는 케이스도 있따고 하여 그래들 파일에 라이브러리 코드랑 관련이 있어보이는걸 삭제했다.
디펜던시에
| dependencies { | |
compile fileTree(include: ['*.jar'], dir: 'libs') //요놈을 지웠다 | |
| androidTestCompile('com.android.support.test.espresso:espresso-core:2.2.2', { | |
| exclude group: 'com.android.support', module: 'support-annotations' | |
| }) | |
| compile 'com.android.support:appcompat-v7:25.3.1' | |
| compile 'com.android.support.constraint:constraint-layout:1.0.2' | |
| compile 'gun0912.ted:tedpermission:1.0.2' | |
| testCompile 'junit:junit:4.12' | |
| } |
그랬더니 에러가 발생하지 않았다..
'지식메모 > 안드로이드 Android' 카테고리의 다른 글
안드로이드 터치 한번으로 글자 복사하기
우선
글자 복사를 하기 위해 클립보드 코드를 작성한다.
ClipboardManager clipboardManager = (ClipboardManager)getSystemService(CLIPBOARD_SERVICE);
ClipData clipData = ClipData.newPlainText("클립보드라벨명", "복사할 텍스트");
clipboardManager.setPrimaryClip(clipData);
1 2 3 4 5 6 7 8 9 10 11 12 13 14 15 16 17 18 19 20 21 22 23 24 | TextView textView= (TextView) findViewById(R.id.text_view); //텍스트뷰 String id= textView.getText().toString(); // 텍스트뷰 글자 가져옴 textView.tvId.setOnTouchListener(new View.OnTouchListener(){ //터치 이벤트 리스너 등록(누를때) @Override public boolean onTouch(View v, MotionEvent event) { // TODO Auto-generated method stub if(event.getAction()==MotionEvent.ACTION_DOWN){ //눌렀을 때 동작 //클립보드 사용 코드 ClipboardManager clipboardManager = (ClipboardManager) getSystemService(CLIPBOARD_SERVICE); ClipData clipData = ClipData.newPlainText("ID",id); //클립보드에 ID라는 이름표로 id 값을 복사하여 저장 clipboardManager.setPrimaryClip(clipData); //복사가 되었다면 토스트메시지 노출 Toast.makeText(context,"ID가 복사되었습니다.",Toast.LENGTH_SHORT).show(); } return true; } }); | cs |
이렇게 해주면 터치하면 텍스트뷰 안에 있는 글자가 클립보드에 복사된다.
혹시
ClipboardManager clipboardManager = (ClipboardManager) getSystemService(CLIPBOARD_SERVICE);
여기서 에러가 나면 context 추가해준다.
context.getSystemService로 바꿔서 하면된다.
이걸 바탕으로 롱프레스 등에 응용하면 된다.
'지식메모 > 안드로이드 Android' 카테고리의 다른 글
안드로이드 이 동작과 관련된 모든 앱이 해제 또는 차단되었거나 설치되지 않았습니다 해결
이건 또 뭔 말인지..
단지 그냥 버튼 누르면 액티비티 시작하게 하려고 했는데
이 동작과 관련된 모든 앱이 해제 또는 차단되었거나 설치되지 않았습니다
이게 토스트메시지로 뜨면서 되질 않는다.
구글 찾아봐도 다 토렌트 얘기하고 그러는데 영문 메시지로 검색해도 뭐가 뭔지 영..
그러다 네이버로 검색해보았떠니
http://blog.naver.com/mdroid_16/220903491982
이런 해결책이 있다고 한다 . 쓰일 함수 안에 intent를 넣어주었더니 해결되었다라..
그래서 시도해보았다.
처음 코드 상태가

이런 식으로 되어있어서 저 Intent it 코드를 OnTouchListener 안에 넣어보았다.
그랬더니 이런 에러가 뜬다.

에러메시지 검색해서 찾아보니
https://stackoverflow.com/questions/20241857/android-intent-cannot-resolve-constructor
여기서 해보라는데로 해보았다.

Intent it = new Intent(this, DBActivity.class); > Intent it = new Intent(v.getContext(), DBActivity.class); 로 수정
this > v.getContext()
이렇게 바꿔주었다.
그랬더니 된다.
다행이다.
'지식메모 > 안드로이드 Android' 카테고리의 다른 글
안드로이드 Intent로 액티비티 시작시 에러 android.util.AndroidRuntimeException: Calling startActivity() from outside of an Activity context requires the FLAG_ACTIVITY_NEW_TASK flag 해결
인텐트로 다른 액티비티를 시작하고자 했는데 에러가 발생
startActivity(it); //에러 발생
1 2 3 4 5 6 7 8 9 10 11 12 13 14 15 16 17 18 19 20 21 22 23 24 25 26 27 28 29 30 31 32 33 34 35 | // input your code herepublic class AlwaysTopServiceTouch extends Service { private View mView; private WindowManager mManager; private WindowManager.LayoutParams mParams; private float mTouchX, mTouchY; private int mViewX, mViewY; private boolean isMove = false; Intent it = new Intent(this, DBActivity.class); private OnTouchListener mViewTouchListener = new OnTouchListener() { @Override public boolean onTouch(View v, MotionEvent event) { switch (event.getAction()) { case MotionEvent.ACTION_DOWN: isMove = false; mTouchX = event.getRawX(); mTouchY = event.getRawY(); mViewX = mParams.x; mViewY = mParams.y; break; case MotionEvent.ACTION_UP: if (!isMove) { // Toast.makeText(getApplicationContext(), "???", // Toast.LENGTH_SHORT).show(); startActivity(it); //에러 발생 } | cs |
에러 코드는
android.util.AndroidRuntimeException: Calling startActivity() from outside of an Activity context requires the FLAG_ACTIVITY_NEW_TASK flag. Is this really what you want?

플래그 어쩌구 저쩌구 FLAG_ACTIVITY_NEW_TASK 이게 요구된다는데
확인결과
서비스는 태스크가 없기 때문에 액티비티를 시작하려면 new task 플래그를 줘야 한다고 한다.
그래서 코드수정
startActivity(it) 를
startActivity(it.addFlags(FLAG_ACTIVITY_NEW_TASK));
위와 같이 수정하니 에러가 발생하지 않았다.
'지식메모 > 안드로이드 Android' 카테고리의 다른 글
| 안드로이드 터치 한번으로 글자 복사하기 (0) | 2017.07.26 |
|---|---|
| 안드로이드 이 동작과 관련된 모든 앱이 해제 또는 차단되었거나 설치되지 않았습니다 해결 (0) | 2017.07.17 |
| Android 손쉽게 권한 획득 가능한 라이브러리 TedPermission (0) | 2017.07.11 |
| 안드로이드 버튼 배경 투명하게 하는법 (0) | 2017.04.04 |
| 안드로이드 마쉬멜로우 6.0 권한 허용 팝업 기능 추가하기 (0) | 2016.08.02 |
Android 손쉽게 권한 획득 가능한 라이브러리 TedPermission
개발자분 블로그 글 참고
깃허브 주소
https://github.com/ParkSangGwon/TedPermission
오버레이 권한 얻기위해서 검색해보다가 TedPermission 이라는 라이브러리를 알게되었다.
한국개발자분이신거 같은데 정말 편하게 만들어 놓으신듯 하다.
블로그 설명에 보면 그래들에 한줄 추가하고
OnCreate에 PermissionListener 코드 추가하고
권한체크 시작 코드 넣으니까 끝났다.
엄청 간편했다.
권한은 권한체크 코드에서
.setPermissions(Manifest.permission.READ_CONTACTS)
요 부분에서 Manifest.permission.각자 필요한 권한 코드만 변경해주면 된다.
권한 목록들 안드로이드 개발자페이지 참고
https://developer.android.com/reference/android/Manifest.permission.html
도움이 되었다면 개발자분 깃허브에 가서
https://github.com/ParkSangGwon/TedPermission

요 버튼을 눌러주자
'지식메모 > 안드로이드 Android' 카테고리의 다른 글
| 안드로이드 이 동작과 관련된 모든 앱이 해제 또는 차단되었거나 설치되지 않았습니다 해결 (0) | 2017.07.17 |
|---|---|
| 안드로이드 Intent로 액티비티 시작시 에러 android.util.AndroidRuntimeException: Calling startActivity() from outside of an Activity context requires the FLAG_ACTIVITY_NEW_TASK flag 해결 (1) | 2017.07.17 |
| 안드로이드 버튼 배경 투명하게 하는법 (0) | 2017.04.04 |
| 안드로이드 마쉬멜로우 6.0 권한 허용 팝업 기능 추가하기 (0) | 2016.08.02 |
| 안드로이드 스튜디오 단축키 (0) | 2016.07.23 |
안드로이드 버튼 배경 투명하게 하는법
버튼 속성에
android:background="#00ff0000"
를 추가해준다.
<Button
android:layout_width="wrap_content"
android:layout_height="wrap_content"
android:background="#00ff0000" //투명
android:id="@+id/button" />
'지식메모 > 안드로이드 Android' 카테고리의 다른 글
| 안드로이드 Intent로 액티비티 시작시 에러 android.util.AndroidRuntimeException: Calling startActivity() from outside of an Activity context requires the FLAG_ACTIVITY_NEW_TASK flag 해결 (1) | 2017.07.17 |
|---|---|
| Android 손쉽게 권한 획득 가능한 라이브러리 TedPermission (0) | 2017.07.11 |
| 안드로이드 마쉬멜로우 6.0 권한 허용 팝업 기능 추가하기 (0) | 2016.08.02 |
| 안드로이드 스튜디오 단축키 (0) | 2016.07.23 |
| 안드로이드 'getDrawable(int)' is deprecated 수정하기 (0) | 2016.06.12 |